
Introduction
One of the projects I loved doing was creating my own token, and thanks to the classes I had at the Women in DeFi Bootcamp of the WomenBiz community.
Seeing so much acceptance by my friends and colleagues within the X community, I was encouraged not only to talk about this project but also to teach them how to create one of their own.
In this tutorial I will show you how to create your own token on the Stellar network, using as an example my personal token, LOTITO. From the choice of the name and design of the token, to giving liquidity and being able to buy tokens from other users. This whole process will be done in Testnet mode so you can experiment without any financial risk.
Let’s get started!
Step 1: What is a token and why create one?
A token is a digital representation of value in a blockchain. It can be used for multiple purposes, such as payouts, rewards or even for creative projects in any area you find yourself working on. Creating your own token can open the doors to new opportunities within the world of Web3, allowing you to have control over your digital assets and as I can imagine, Stellar also facilitates this process quickly and easily.
Step 2: Preparation for the creation of the token
Before you start creating the token in Stellar, you will need to perform certain necessary actions.
a1) Create a Stellar wallet on the test network (Testnet) to manage your token. For this, I recommend you use a wallet like Freighter in Testnet mode.
2) Get familiar with CheesecakeLabs. It is a platform where you can launch and manage your token within the Stellar ecosystem.
3) Access testnet in Freighter. The Stellar test network will allow you to simulate the creation of your token without using real money. At first you will not have funds to do so you can opt for the option of giving you funds, this is completely free just for you to learn how to use it.

Step 3: Creating the token in CheesecakeLabs
Follow these steps to create the token:
1) Log in to CheesecakeLabs in testnet mode: Go to CheesecakeLabs Testnet and log in with your Freighter wallet
2) Defines the token name and symbol:
-
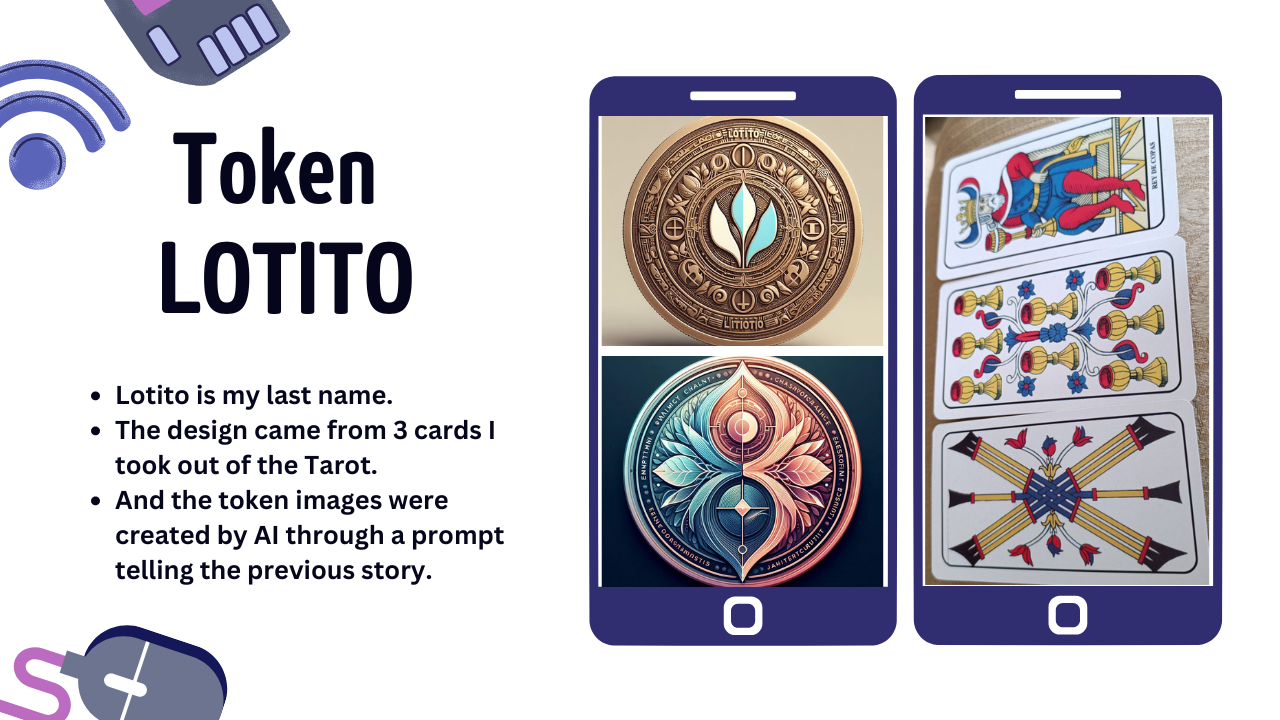
Token name: Here you will have to choose the name that identifies your token. For example, in my case I used the name "LOTITO", inspired by the representation of security and trust.
-
Design: You can create a unique personality for your token, remember that it can be used in your community, friends, work or any area, and it is important to represent them.
Something curious I would like to add here is that this is my surname and it has a great meaning for me, so I wanted to give it that name and also make it representative for all my family in Bolivia, Argentina, Italy and other places where we spread out.
As for the design, I create it based on the cards of the Tarot, to the luck I took 3 cards which today represent my token, and thanks to the AI of Microsoft Bing, born LOTITO.
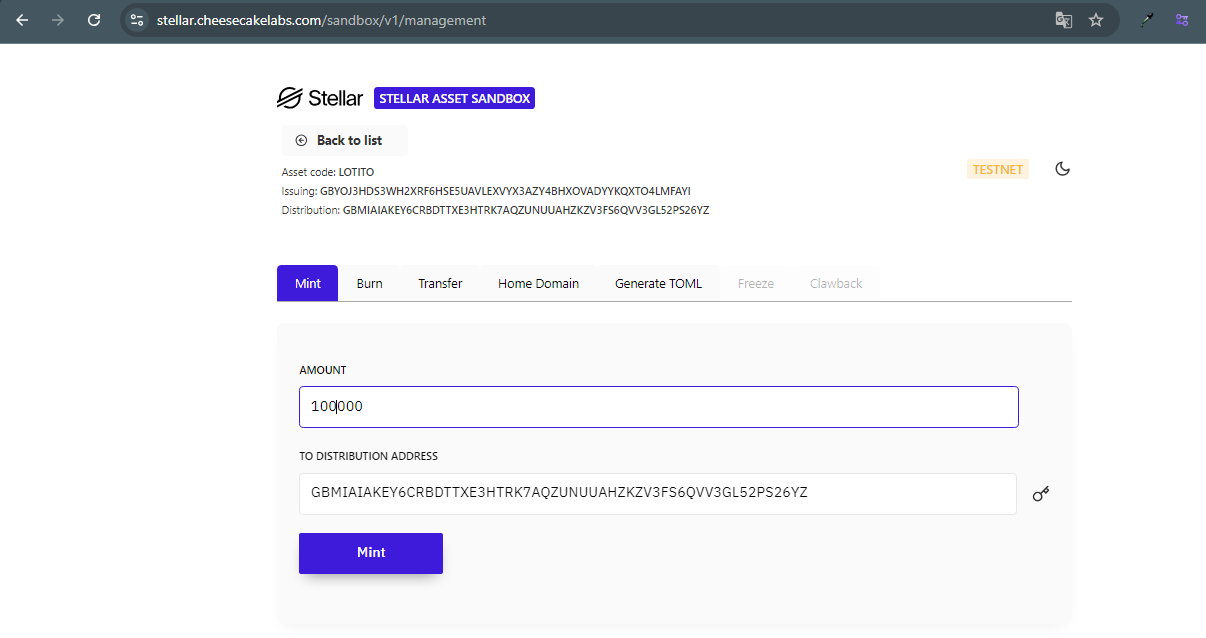
3) Define the total quantity: Decide how many units of the token you want to create. For example, in my case I defined a total of 100,000 LOTITOS.
4) Optional configurations: If you want to add additional features like the ability to "burn" tokens (remove tokens from circulation), you can do so here.
5) Launches the token: Once you have filled in all the information, press the "Create Token" button. Congratulations! Your token is now on the Stellar Testnet network.
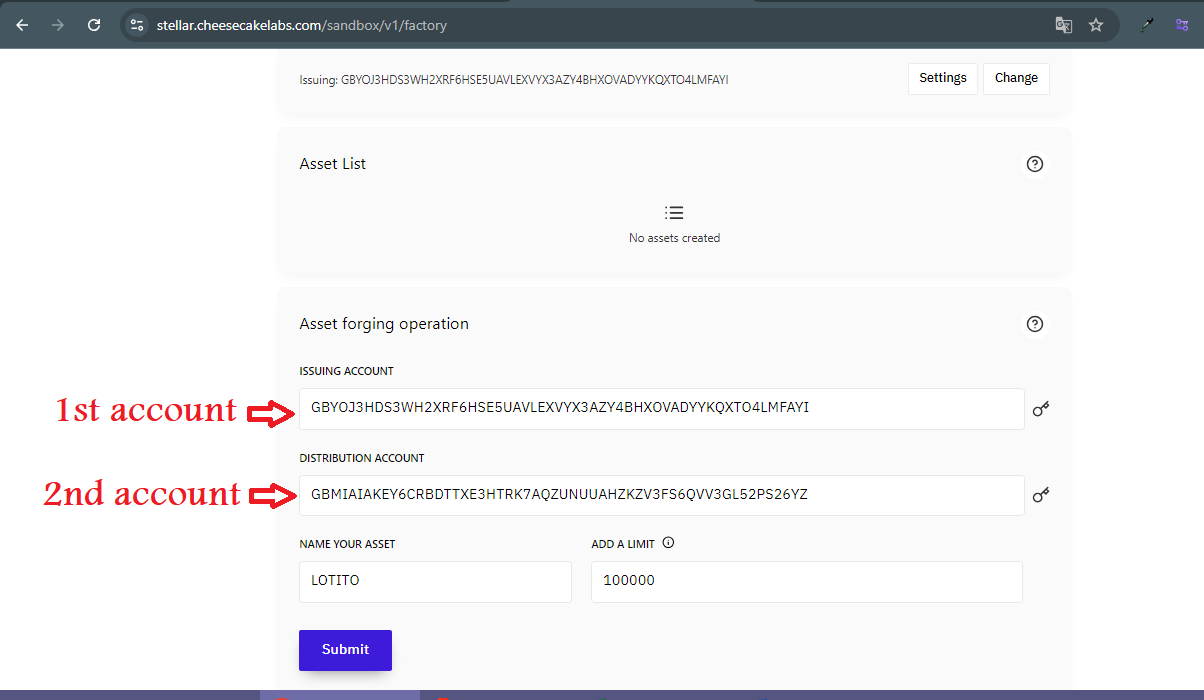
*Important: As you can see you must enter 2 accounts, one that is the transmitter and another the receiver, for this I advise you to create two accounts in Freighter (as I explained in step 2). Then you will place the 1st account as sender and the 2nd account created as receiver.
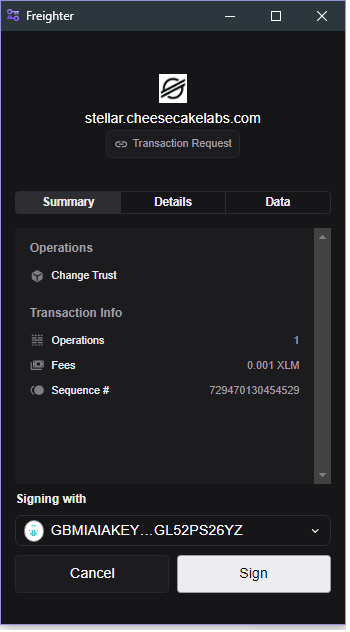
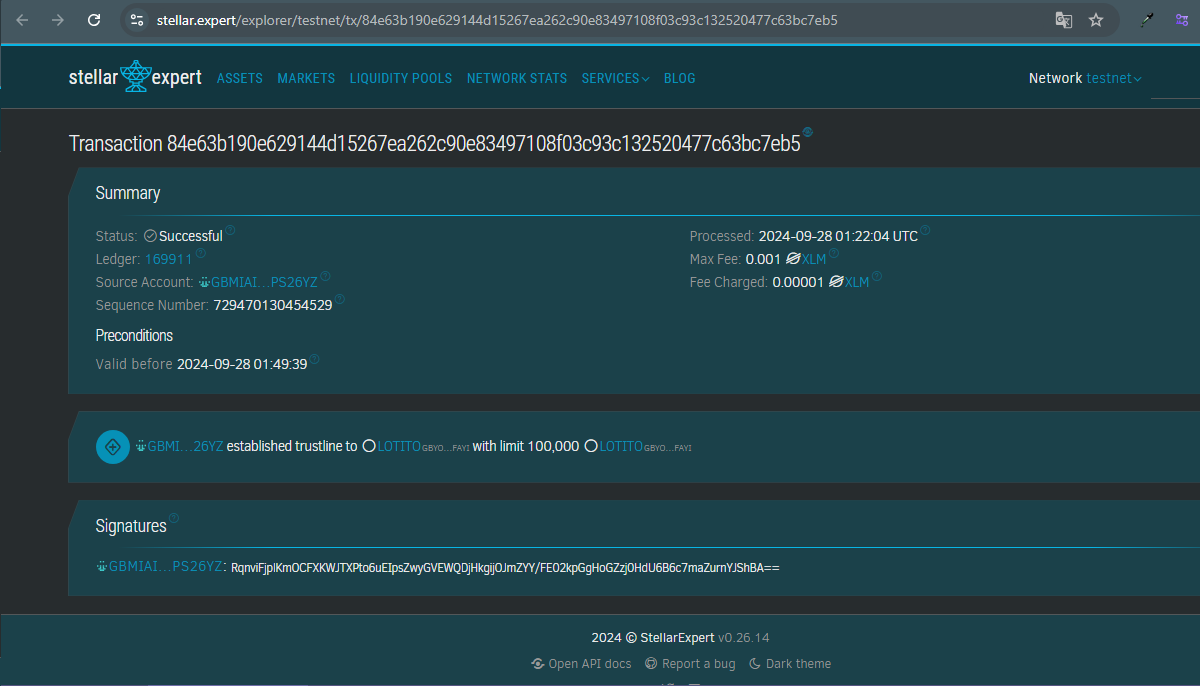
In addition, you will see that all these actions we are performing must be signed and accepted in your wallet, as it is like a permission you give to these platforms, remember that all information is transparent and you can check it at any time through the links that send you as vouchers.
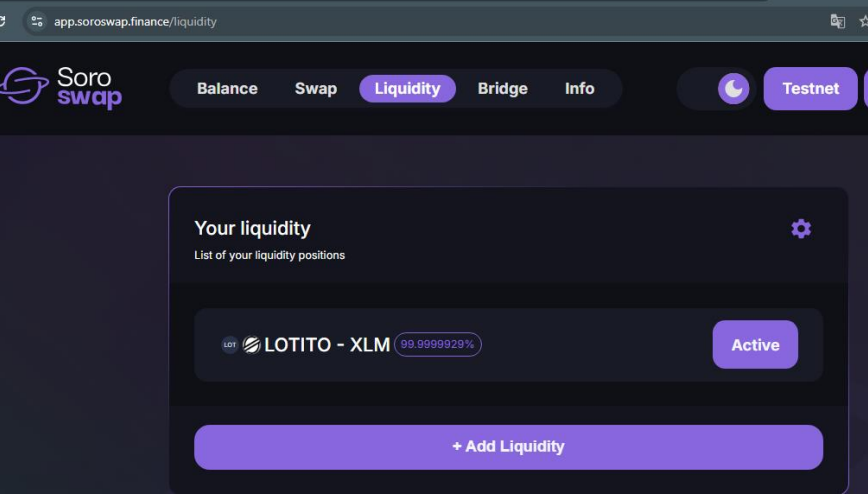
Step 4: Give your token liquidity
For this step you must send the total amount of your token to the 2nd account so that we can add liquidity, then you will press in Manage and you will have another tab to be able to send all the tokens from account 1 to 2. Go to the tab that says Manage.
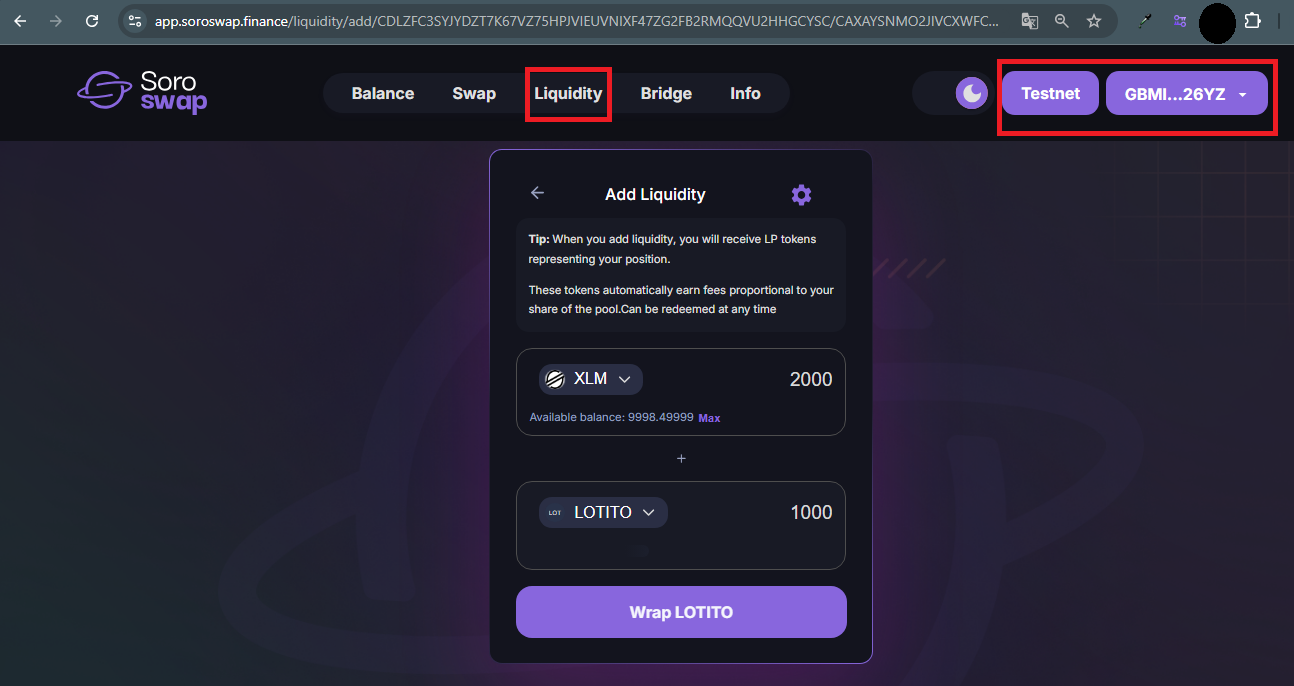
After that, we'll go to the Soroswap page where we'll be able to give liquidity to the token for other people can buy and sell.
1) Connect your 2nd Freighter account to Soroswap:
-
You go to the tab of Liquidit and press in Add Liquidity.
-
Here you will enter what parity the token will have with XLM (Stellar’s token), for example, I put: 1,000 LOTITO will be equivalent to 2,000XLM.
2) Configure to get our token in the official token list:
-
Soroswap works with already cured tokens, that is, those that are reliable and as our token is new we have to perform some extra steps.
-
To find it we must copy the link of our token, in my case is: LOTITO:GBYOJ3HDS3WH2XRF6HSE5UAVLEXVYX3AZY4BHXOVADYYKQXXTO4LMFAYI. This information comes from the sum of your token name:address of your wallet.
-
It will take a bit of time to find this part, but after you find it, just press your token and you’re done. Another important thing is that you always say the ":" which separates the name of the token from the other data, to facilitate the search.
3) Configure the purchase/sale orders:
-
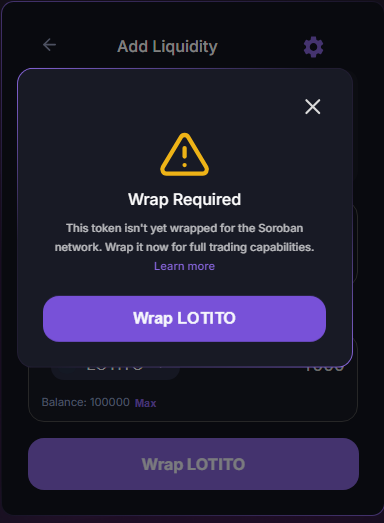
Then you will press on Wrap, that means a contract associated with your token will be created.
-
You will get a danger message, but remember that this token is not on the Soroswap list and takes it as if it were not a reliable token. You must press in Understanding.
- So that’s where you can just put the ratio to your token in relation to XLM, press Create and you’re done.
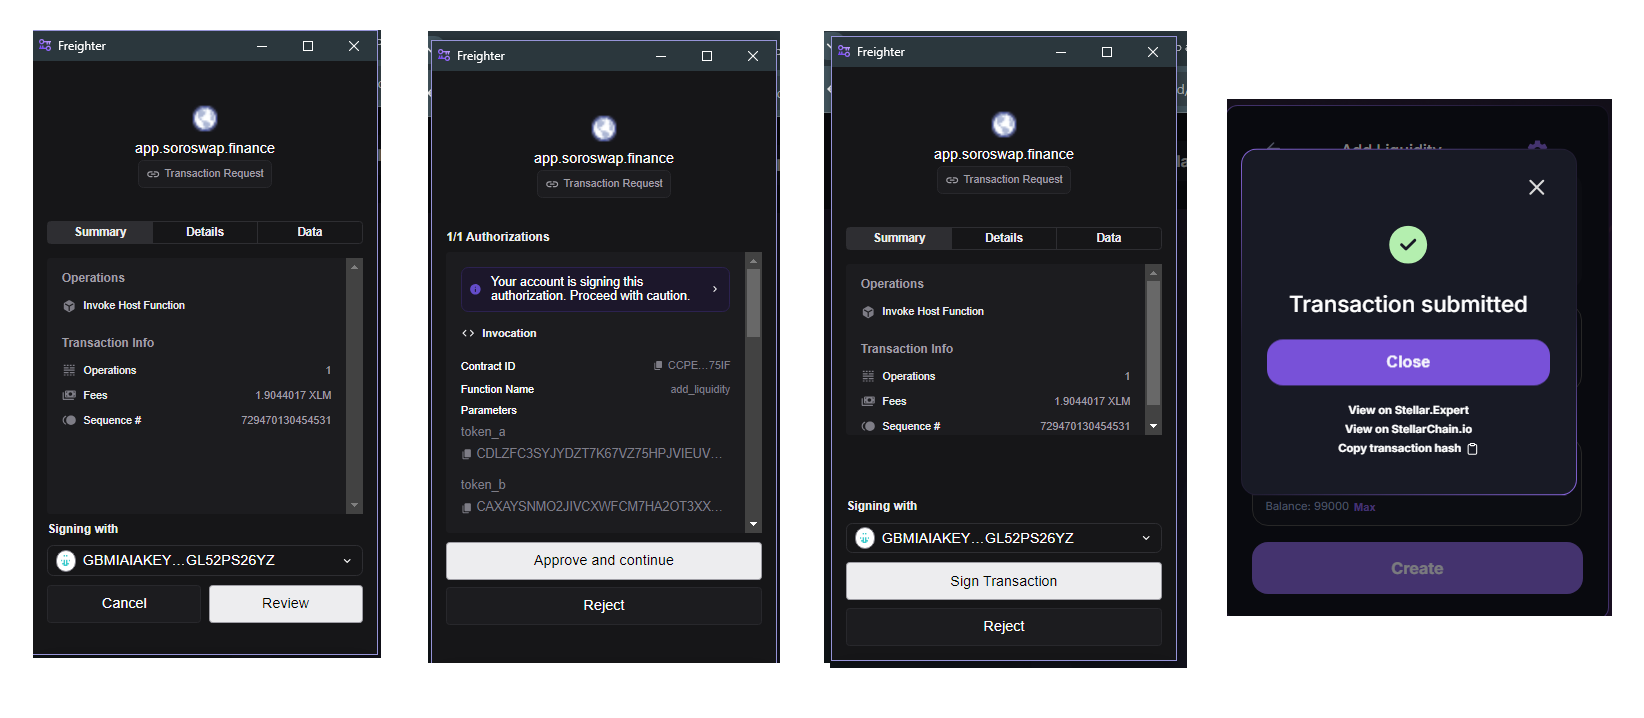
- Finally, you press Add Liquidity and you will see in the liquidity tab that your transaction was successful and you can exchange your token for XLM, do not forget that we are working on testnet.
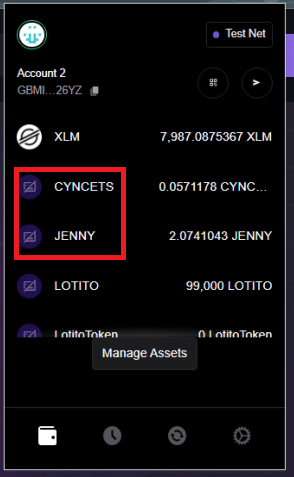
Step 5: Buy tokens from other users
Once your token has liquidity, you can also experiment by buying tokens from other users on the testnet.
1) Explore the testnet market: You go to the Swap tab and there you will see which tokens are available on the Testnet network.
2) Make simulated purchases: With the liquidity you have added, you can practice buying and selling tokens. Remember that they will also find out that your token does not exist, so they must follow step 4 to find it and then buy.

In my case I bought several tokens that created my fellow Bootcamp, there you can see some of their names and prices. Here I show you the process that had my token LOTITO.
Conclusion
Creating your own token in Stellar can be done easily using platforms like CheesecakeLabs. In this tutorial, I guided you through the steps to create the token, give it liquidity and start trading with it.
I hope it helps you a lot and share with me how you did so that I can also get your token. With Stellar, the possibilities are endless, and the Testnet network is the perfect place to experiment and learn before you launch into the real market.
*Why this matters
This tutorial not only lets you learn how to create your own token, but also introduces you to the world of digital asset tokenization. Stellar and its ecosystem facilitate financial inclusion, allowing any visionary to explore new paths to innovation. By mastering token creation, you are taking an important step towards the future of the digital economy.
*FAQ
Is it safe to create a token on testnet? Yes, Testnet is a test environment with no real financial risks. Ideal for learning.
What is a token in the Stellar network? A token is a digital representation of an asset that you can trade on the Stellar blockchain.
Can I sell my token once created? Yes, you can offer your token in exchange markets by adding liquidity.
Is it possible to migrate my testnet token to the main network? Yes, once you are ready, you can replicate the process on the main network to launch your token to the real market.
What do I need to create a token in Stellar? You only need a wallet at Freighter, access to CheesecakeLabs and the desire to learn and experiment.
Bibliography
-
CheesecakeLabs Stellar: https://stellar.cheesecakelabs.com/sandbox/v1
-
Freighter. https://www.freighter.app/
-
Soroswap. https://app.soroswap.finance/liquidity
-
Stellar Development Foundation: https://www.stellar.org
-
Stellar Testnet Documentation: https://developers.stellar.org/docs/tutorials

评论 (0)