
Introduction
Ethereum’s journey towards scalability saw a significant milestone with the implementation of Proto-Danksharding (EIP-4844) on March 13, 2024. This upgrade introduced Ethereum blobs, large binary objects specifically designed to optimize Layer 2 (L2) scaling. Ethereum blobs revolutionized data availability for rollups, allowing transactions to be processed more efficiently and at a significantly reduced cost.
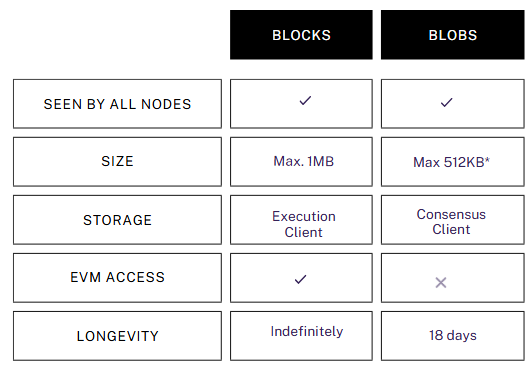
What Are Ethereum Blobs?
Blobs were introduced as ephemeral data objects stored outside the Ethereum Virtual Machine (EVM), enabling rollups to manage large data chunks off-chain while referencing them on-chain. This design reduces gas costs, improves transaction throughput, and minimizes the computational load on Ethereum’s mainnet, all while preserving security and decentralization.
The actual blob data is stored on the consensus layer, not directly on the Ethereum blockchain, allowing the network to scale efficiently. While Solidity does not support creating or modifying blob data within smart contracts, the management of blob data is handled entirely at the consensus layer.
Transactions following EIP-4844 specifications include a special static field named blob_versioned_hashes. These hashes reference blobs and must be backed by valid commitments and proofs, which are critical for ensuring the integrity and validity of blobs as they are propagated across the peer-to-peer network. This ensures that Ethereum maintains robust data availability and security, even as rollups leverage blobs to scale transaction throughput.
Why Blobs Matter:
-
🌐 Scalability: Rollups got a storage upgrade, can offload larger data chunks now.
-
💰 Cost Efficiency: Blobs cost less than traditional storage, cheaper for L2s and thus cheaper fees on L2 networks.
-
⚡ Future-Proof: Part of a larger picture of Ethereum Sharding Roadmap
Setting Up the Development Environment
Let’s get our hands dirty with Ethereum Blobs💪
1. Install Required Tools
-
Node.js and npm: Download and install Node.js and npm for dependency management.
-
Python3: Install the latest version from python.org.
2. Set Up Environment
We will use the Ethereum Mainnet for this example, but you can modify the configuration for your desired network.
Set Up an Ethereum Wallet
-
Use MetaMask or another wallet.
-
Create a new account and fund it with ETH.
-
Copy the private key and store it securely, as we’ll use it later.
Install Node Packages
Run the following commands in your terminal:
npm install viem
npm install c-kzg
Set Up Files
-
Navigate to your project directory and create the following files:
-
client.ts -
kzg.ts -
example.ts
-
1. Step-by-Step Development Guide
A. Create the client.ts File
Set up your wallet and connect to Ethereum Mainnet.
import { createWalletClient, http } from 'viem'
import { privateKeyToAccount } from 'viem/accounts'
import { mainnet } from 'viem/chains'

// replace .... with your copied private key from step 2
export const account = privateKeyToAccount('0x...')

export const client = createWalletClient({
  account,
  chain: mainnet,
  transport: http()
})
B. Create the kzg.ts File
Configure c-KZG and set up the trusted KZG parameters.
import * as cKzg from 'c-kzg'
import { setupKzg } from 'viem'
import { mainnetTrustedSetupPath } from 'viem/node'

export const kzg = setupKzg(cKzg, mainnetTrustedSetupPath)
C. Create the example.ts File
Prepare and send your first blob transaction.
import { parseGwei, stringToHex, toBlobs } from 'viem'
import { account, client } from './client'
import { kzg } from './kzg'

const blobs = toBlobs({ data: stringToHex('hello blobs') })

const hash = await client.sendTransaction({
  blobs,
  kzg,
  maxFeePerBlobGas: parseGwei('30'),
  to: '0x0000000000000000000000000000000000000000',
})

console.log(hash)
2. Detailed Steps
A. Execute the Code
Run the example.ts file to send your first blob transaction:
node example.ts
- You’ll see the hash of the transaction displayed in the console.
B. Track Your Transaction
Use the transaction hash to track your blob transaction on a blob explorer like Blobscan.
And that's it! You've successfully sent your first Blob Transaction using Viem. 🎉
This setup enables you to experiment with Ethereum blobs and understand how to integrate blob transactions into your decentralized applications.
3. One Task at a Time
-
Understand the Basics: Test sending a simple blob transaction using the provided code.
-
Experiment with Rollups: Explore how blobs integrate with rollup-specific configurations.
-
Visualize Blob Transactions:
Build a frontend dashboard using React.js or Next.js to:
-
Display blob transaction hashes and metadata.
-
Simulate blob addition and retrieval in a user-friendly interface.
-
Conclusion: What’s Next?
Ethereum blobs are a revolutionary step toward achieving scalable, cost-efficient transactions on Layer 2. With this guide, you’ve taken the first step in understanding and interacting with blob transactions on Ethereum.
Advanced Topics
-
Explore the technical specifications of EIP-4844.
-
Build a dApp that uses blobs for off-chain data storage.
-
Leverage blobs in rollup transactions for improved scalability.
Final Thoughts
Ethereum blobs are a game-changer, revolutionizing scalability for Layer 2 rollups. By slashing costs and boosting speed, blobs make Ethereum efficient, accessible, and ready for real-world adoption. For developers, they’re intuitive to use and open the door to groundbreaking dApps.
Vision for the Future
Blobs are the future of Ethereum scaling, paving the way for 100,000+ TPS with Danksharding. They will transform industries like DeFi, gaming, and AI while driving global Web3 adoption. Blobs are not just scaling Ethereum—they’re scaling the future of decentralized innovation.📈

Resources
Keep experimenting, keep innovating, and explore the limitless possibilities Ethereum blobs unlock for the decentralized future. 🌍✨


评论 (0)